Home Sweet Home

Happy February everyone!

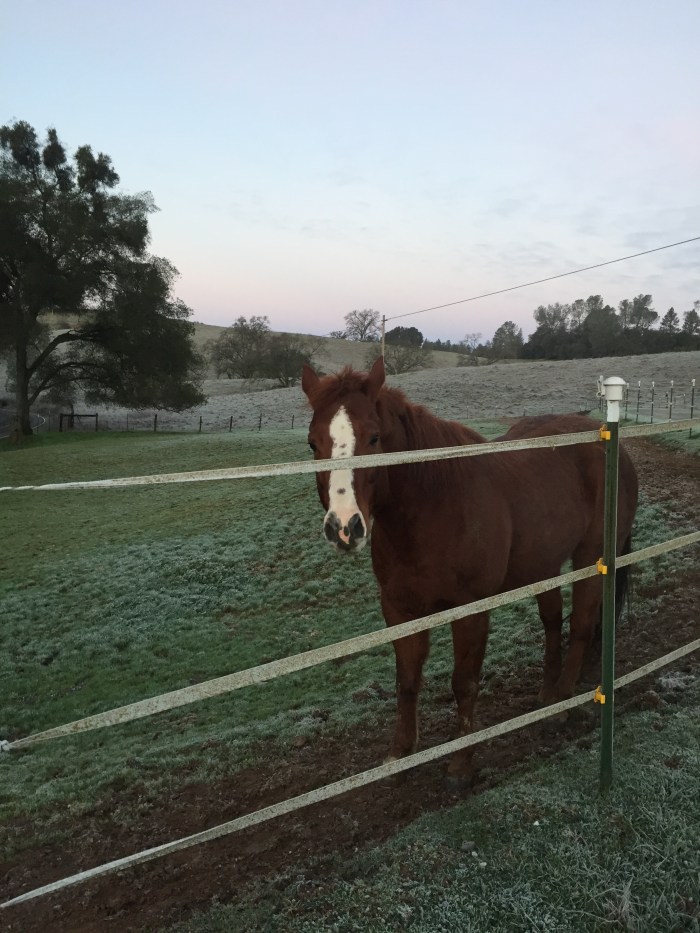
It’s been a while and my little family has been busy! After what seemed like FOREVER, we sold our home and moved to a horse ranch.The whole thing was not without drama/bank shenanigans (seriously, it seemed like everything that could go wrong did go wrong), but we finally had our moving day on the weekend of the 21st.

I’m beyond excited and can’t believe that I get to wake up there every day! In fact, my horse was out in one of the pastures for a few days, and he ran alongside my car when I left for work… it was the most surreal experience! I can’t believe this is my life now!

img_2133

Now that the drama of the move is over, we’re getting settled in.

img_2126

We absolutely love the home and the property! I can’t wait to make so many memories here and to spend every extra minute I can riding! The pups have a huge back yard and are loving running around and barking at the horses. Life is so dang good!


DIY Daily Calendar Journal

Instead of focusing on resolutions this year, I decided to try something a little different. I found the idea on Pinterest which led me to this site with a cute little tutorial. The idea is that you write the year and then a sentence (or phrase) about the day. Each year you add a line to the card and over time your perpetual calendar becomes almost a diary of sorts.

Mine is not nearly as fancy… and I didn’t use the printables… instead I used regular index cards (in fun colors, of course) and wrote the date on the top right corner of each one.

Here’s what my little box looks like:

Daily Calendar Journal

I found the containers at Staples (because I’m obsessed with that place) as well as the index cards and the dividers. I made a box for my mom, sister, and aunt. We’ve tossed around ideas such as using it as a God Box Project or a gratitude journal as well… I’m going to stick to the sentence about each day. I’m going to try to do it each night before bed and to be honest… if it’s a crummy day, then the sentence may reflect that. I’m a firm believer that everything is not always rainbows and sunshine and sometimes it’s therapeutic to get the not-so-good stuff documented. I’ll use it as sort of a “put the day to bed” moment.

Here’s to an amazing 2015! Stay tuned over the next few days… I’ll be posting a review of my new Erin Condren life planner! I can’t wait to share it!

My First Pinterest Project

I am not a very crafty person… when I pin things on Pinterest, it’s usually food. However, a couple of weekends ago I took on my very first Pinterest project. I’m proud to say that it was actually successful (on a side note, have you ever read any of these Pinterest fails? Hilarious that they actually have an entire website devoted to them!)

Here’s what inspired mine:

Ballard Designs Laundry Rack

It’s stunning, but that sucker sets you back $250! I did some searching on Pinterest and found a blog where a girl had made her own. I’m a smart cookie, so I figured how hard could it be?

I headed over to my local Lowe’s and picked up the supplies – basically two big boards, some dowels, a bunch of screws & nails, hinges, chain, and some long thin pieces of wood (seriously, the other girl’s blog details it step by step – with pictures. I did change-up the measurements for my laundry room). I went home and got to work. Mike had to show me how to use the skill saw, but I was very pleasantly surprised at how easy it was. I used a drill to make the holes for the dowels, and before I knew it I was painting! I painted the backboard and ladder separately and then assembled them.

The whole thing basically took two days (most of Saturday doing the carpentry and then some paint touch ups on Sunday) and I’m pretty pleased with the outcome! Mike and Raymond hung them for me (instead of picture hooks they bolted them into the studs so I don’t have to worry about the weight). I might do some more touch up (maybe paint over the bolts?) but I’m really happy with it!

Laundry Rack
Laundry Rack
Laundry Room
Laundry Room

Clean Your Microwave!

Ok, I know this is a totally dorky, OCD post, but I have to share with my dorky, OCD friends. I was playing around on Pinterest a few days ago and found this “clean your microwave with a glass of this” post. If your microwave is anything like mine, it looks like the inside of a room Dexter’s had his way with. I even bought this little thing that you put over the top of your plate to keep stuff from splattering all over, but most of the time it just gets left somewhere outside the microwave.

Then, when I finally get fed up enough, I stand on my tippy toes, cursing whoever I think may have left the lid off (totally never me) scrubbing as hard as I can.

Well folks, scrub no more. It really is this easy:

  1. Get a measuring cup or bowl.
  2. Add one cup hot water and one cup white vinegar.
  3. Put in the microwave and turn on for 10 minutes.
  4. When the microwave goes ” beep, beep, beep” wipe it out with a paper towel.

Seriously, wipe it. No scrubbing necessary. The way it works is that the water and vinegar basically steam clean the inside of your microwave. It’s so freaking easy!

You’re welcome.